As the leaves change and the air turns crisp, fall brings with it an opportunity to embrace the earthy colors and vibrant aesthetics of the season, not just in our wardrobe but right down to our fingertips. Nail art, a creative expression that transcends mere fashion accessory, becomes especially meaningful during autumn. It’s a time when the rich palettes of maroon, orange, and gold find their echo in the designs that adorn our nails. This article explores an array of fall-themed nail designs that capture the essence of autumn. From the rustic charm of sunflower decals to the bold statement of sunset hues, each design offers a unique celebration of the season, providing inspiration for anyone looking to add a touch of autumnal elegance to their look.
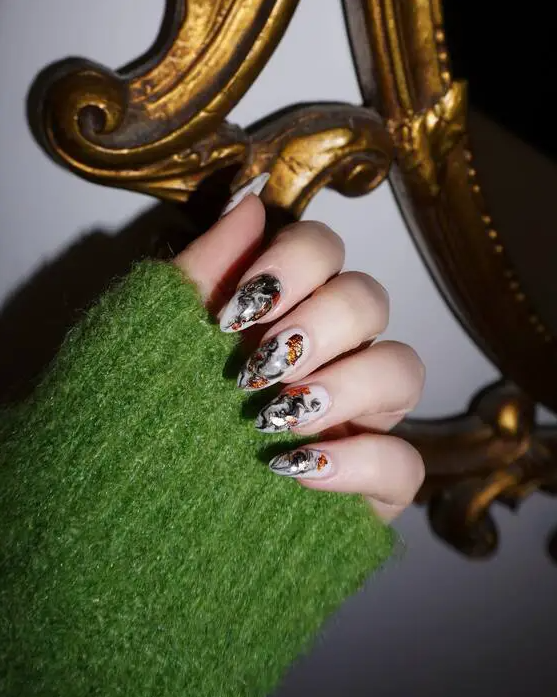
Artistic Autumn Medley
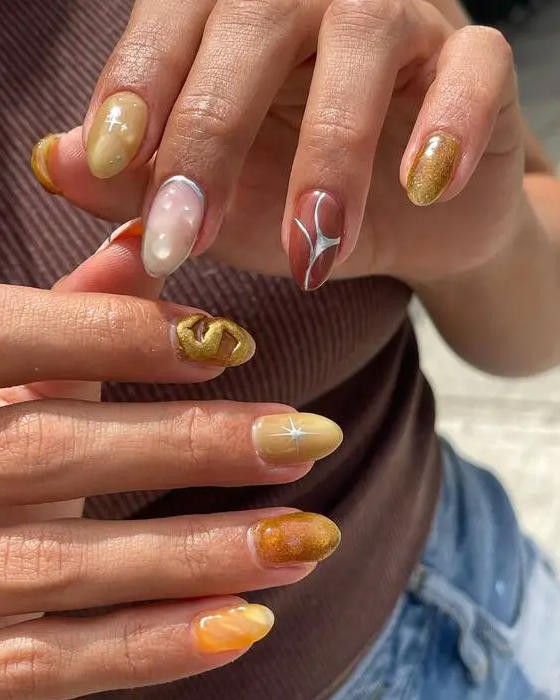
This eclectic nail design showcases a medley of artistic techniques and autumnal colors. Each nail presents a unique pattern ranging from metallic gold swirls to soft marble effects, encapsulating the whimsical and vibrant spirit of fall. The incorporation of varying textures and the clever use of negative space creates a modern and artistic interpretation of autumn nails.
Materials Needed
- Base Coat: OPI Natural Nail Base Coat
- Metallic Gold Polish: Essie ‘Good as Gold’
- Marble Effect Polishes: Light grey and white
- Top Coat: Seche Vite Dry Fast Top Coat
- Detailing Brushes
DIY Instructions
Start with a base coat to protect your nails. Apply a light grey polish as a base for the marble and metallic nails. For the marble effect, lightly dab white polish with a sponge and swirl with a detail brush moistened with nail polish remover. For the metallic swirls, use a fine brush to create freehand designs with gold polish. Seal all designs with a fast-drying top coat for a glossy finish.
Autumn Leaf Encapsulated Art
This nail design delicately captures the essence of fall through its use of transparent tips filled with tiny autumn leaves and gold flakes. This encapsulated technique not only preserves the beauty of the season within each nail but also creates a striking visual impact with its depth and clarity.
Materials Needed
- Base Coat: Essie ‘Grow Stronger’
- Clear Acrylic or Gel for the tips
- Autumn Leaf and Gold Flake Decals
- Top Coat: INM Out the Door
DIY Instructions
Begin by applying a base coat. Use clear acrylic or gel to extend the nails, embedding tiny dried leaves and gold flakes within the tips as you sculpt. Cure under a lamp if using gel to ensure durability. Finish with a layer of top coat to enhance the overall shine and seal in the delicate decals.
Autumn Sky And Leaves
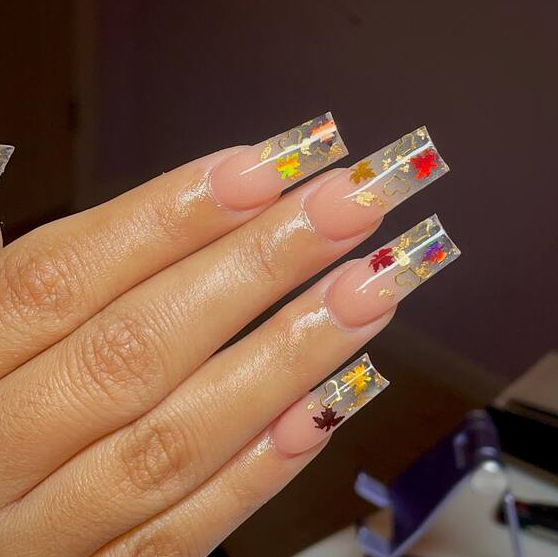
Celebrating the essence of fall, this design features clear tips with a whimsical display of autumn leaves against a backdrop reminiscent of an autumn sky at dusk. The use of bright yellow, red, and brown leaves over the clear base evokes the feeling of leaves falling against a sunset—a truly poetic visual for the season.
Materials Needed
- Base Coat: CND Stickey Base Coat
- Nude Polish: OPI ‘Tiramisu for Two’
- Clear Acrylic or Gel for creating the tips
- Autumn Leaf Decals
- Top Coat: Sally Hansen Miracle Gel Top Coat
DIY Instructions
Apply a base coat followed by a coat of nude polish for a clean, subtle look. Create the tips with clear acrylic or gel. Before curing, place autumn leaf decals onto the clear material to emulate leaves scattered by a gentle fall breeze. Cure as needed and finish with a top coat to ensure the decals stay in place and to add a natural gloss.
Autumn Twilight
The third design is a stunning representation of fall’s vibrant sunsets with its blend of orange hues and glitter accents. The transparent tips with floating leaves and the solid glitter accent nail complement each other, creating a balanced and eye-catching design.
Materials Needed
- Base Coat: CND Stickey Base Coat
- Orange Gradient Polishes: OPI ‘Yank My Doodle’, ‘It’s a Piazza Cake’, ‘Freedom of Peach’
- Glitter Polish: Orly ‘Star Spangled’
- Leaf Stickers or decals
- Top Coat: INM Out The Door
DIY Instructions
Begin with a base coat. For the gradient, apply the lightest orange near the cuticle, blend into the medium shade, and then the darkest at the tip. Use a sponge for the best ombre effect. Apply the glitter polish on the ring finger as an accent. For the leaves, place stickers or hand-paint with a thin brush. Seal everything with a fast-drying top coat.
Cartoonish Charm
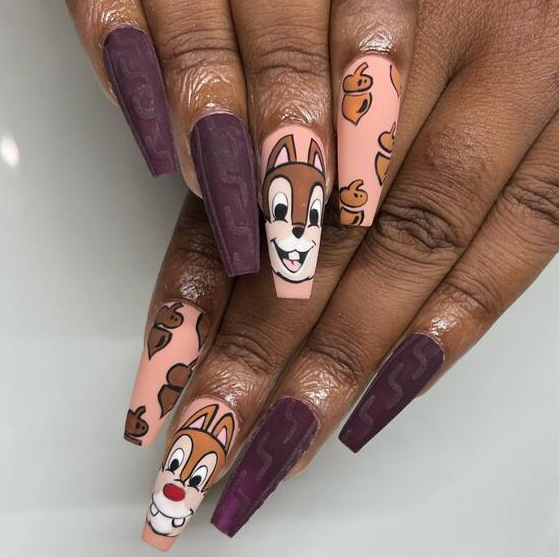
This playful design combines fun cartoon figures with a sophisticated color palette of peach and deep purple. The alternating pattern of character faces and simplistic shapes gives it a youthful yet elegant vibe, perfect for casual outings or a unique statement at seasonal gatherings.
Materials Needed
- Base Coat: Essie ‘Grow Stronger’
- Peach Nail Polish: China Glaze ‘Peachy Keen’
- Purple Nail Polish: Zoya ‘Margo’
- Acrylic Paints for the cartoon details
- Detailing Brush
- Top Coat: Revlon Quick Dry Top Coat
DIY Instructions
Apply the base coat to clean nails. Once dry, paint your nails alternately with peach and purple polishes. Use acrylic paints and a detailing brush to add the cartoon designs. It’s easier to work with acrylic paints on nails as they allow for more control and opacity. Finish with a quick-dry top coat to protect your design and add shine.
Chic And Shimmering Neutrals
This elegant nail design offers a sophisticated blend of neutral tones enhanced by shimmering glitter and precise geometric patterns. The use of soft pink as a base paired with rich browns and sparkling accents creates a versatile look suitable for both day and evening fall events.
Materials Needed
- Base Coat: OPI Natural Base Coat
- Pink Nail Polish: Essie ‘Ballet Slippers’
- Brown Glitter Polish: Zoya ‘PixieDust’
- Striping Tape for geometric designs
- Top Coat: CND Vinylux Long Wear Top Coat
DIY Instructions
Apply a base coat to protect your nails. Use ‘Ballet Slippers’ as the base color for a clean, subtle look. Once dry, apply striping tape in your desired pattern and paint over it with the brown glitter polish. Carefully remove the tape while the polish is still wet to ensure crisp lines. Finish with a top coat for a lasting glossy finish.
Classic Burgundy Brilliance
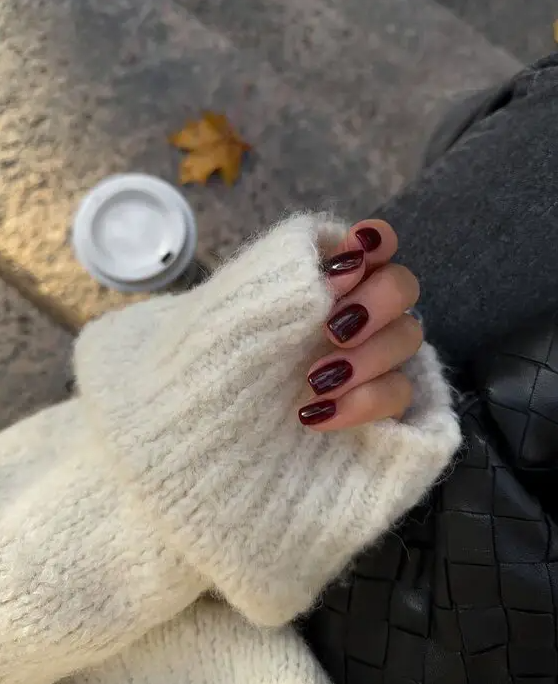
This look is the epitome of fall sophistication with its deep burgundy shade, which reflects the rich, warm tones of autumn leaves and seasonal festivities. The glossy finish adds an element of elegance, making this style suitable for both everyday wear and special occasions during the cooler months.
Materials Needed
- Base Coat: OPI Natural Nail Base Coat
- Burgundy Nail Polish: Essie ‘Bordeaux’
- Top Coat: Sally Hansen Mega Shine Top Coat
DIY Instructions
Apply a base coat to protect your nails and enhance polish adhesion. Paint two coats of ‘Bordeaux’ for a deep, opaque burgundy finish. Allow each coat to dry thoroughly before applying the next to avoid smudging. Finish with a high-shine top coat to ensure your manicure remains glossy and chip-free for days.
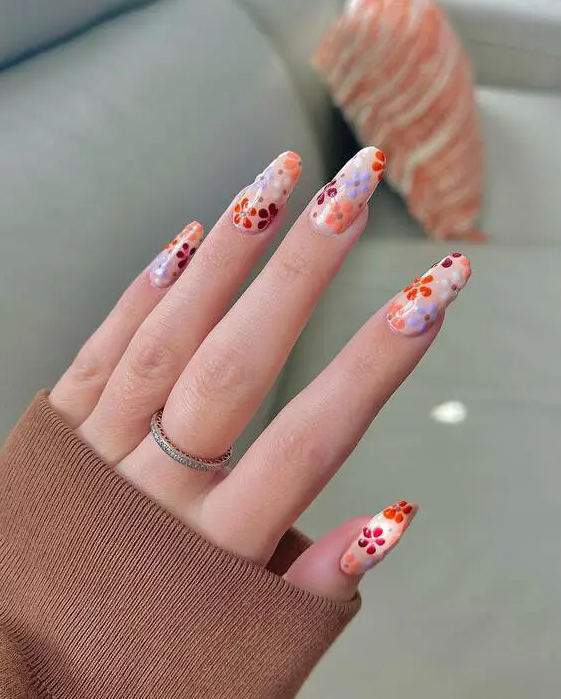
Delicate Fall Flowers
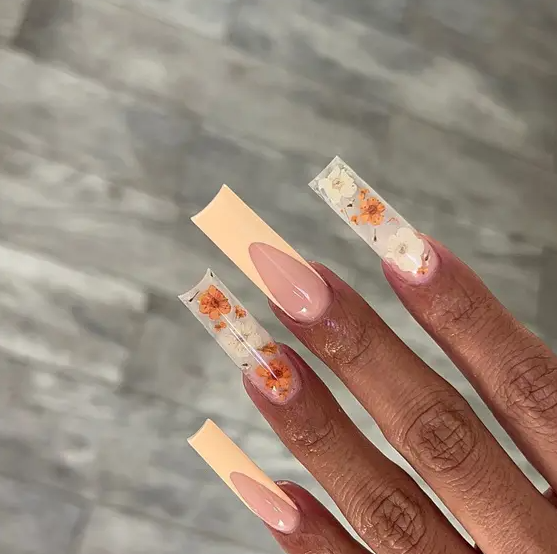
This nail design is an ode to the delicate, fleeting beauty of autumn florals. The soft, blush pink base serves as a perfect backdrop for the vivid orange flowers encapsulated within the clear tips, creating a stunning 3D effect. The subtle gradient from opaque to translucent allows each floral detail to stand out, making this design not just a manicure but a piece of wearable art.
Materials Needed
- Base Coat: OPI Natural Nail Base Coat
- Blush Pink Polish: Essie ‘Minimalistic’
- Clear Acrylic or Gel for the tips
- Dried Flower Decals
- Top Coat: INM Out the Door Top Coat
DIY Instructions
Start with a base coat to protect your natural nails. Apply the blush pink polish as the base. For the tips, use clear acrylic or gel to extend the nails, embedding the dried flower decals within the material as you sculpt. Cure under a UV or LED lamp if using gel. Seal everything with a glossy top coat for durability and shine.
Elegant Autumn Ombre
This design is the epitome of autumn elegance with its deep brown ombre fading into a soft pink. The addition of delicate leaf accents in gold gives a nod to falling autumn leaves, perfect for a sophisticated seasonal look.
Materials Needed
- Base Coat: Essie ‘Grow Stronger’
- Brown Nail Polish: OPI ‘You Don’t Know Jacques’
- Pink Nail Polish: OPI ‘Dulce de Leche’
- Gold Leaf Paint
- Sponge for Ombre Effect
- Top Coat: INM Out the Door
DIY Instructions
Apply a base coat to protect your nails. Use the sponge to create an ombre effect, starting with brown at the nail base and blending into pink towards the tips. Once dry, use a fine brush to add subtle gold leaf accents. Seal the design with a top coat for durability and gloss.
Elegant Lavender And Tortoise Shell Fusion
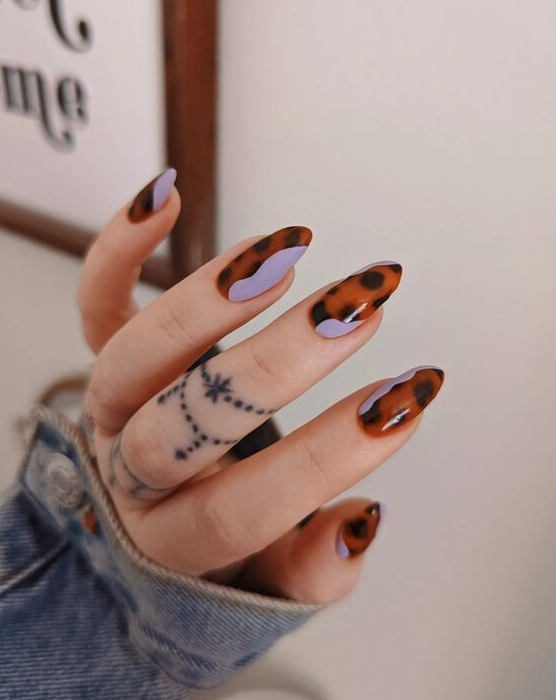
This nail design uniquely combines the softness of lavender with the bold, dynamic patterns of tortoise shell. It’s an unexpected yet stunning combination that brings a modern twist to traditional autumn aesthetics.
Materials Needed
- Base Coat: Sally Hansen Double Duty
- Lavender Nail Polish: Essie ‘Go Ginza’
- Tortoise Shell Effect Polish: DIY mixture of brown, black, and amber
- Top Coat: Seche Vite Dry Fast Top Coat
DIY Instructions
Begin with a protective base coat. Apply two coats of ‘Go Ginza’ for a solid lavender base. For the tortoise shell effect, dab on a mixture of brown, black, and amber polish using a small sponge, layering the colors while wet to achieve the desired pattern. Seal the design with a fast-drying top coat to enhance durability and shine.
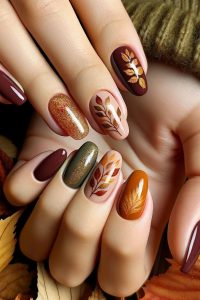
Fall Leaves Delight
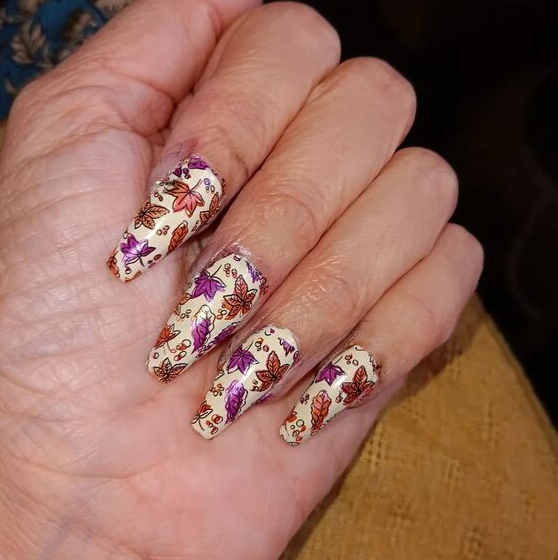
The first design captures the essence of fall with its intricate leaf patterns over a creamy base. Each nail is a canvas displaying a variety of leaves in shades of orange, purple, and brown, resembling the fall foliage. The meticulous application of metallic lines adds a luxurious touch, making each leaf pop against the subtle background.
Materials Needed
- Base Coat: Sally Hansen Double Duty
- Cream Nail Polish: OPI ‘Be There in a Prosecco’
- Metallic Polishes: Essie ‘Penny Talk’ for orange, ‘No Place Like Chrome’ for silver
- Fine Detail Brush
- Top Coat: Seche Vite Dry Fast Top Coat
DIY Instructions
Start by applying a base coat to protect your nails. Once dry, apply two coats of the cream polish as the background. Using a fine detail brush, paint the leaves in selected metallic shades. To achieve crisp lines, steady your hand and work in a well-lit area. Allow the design to dry thoroughly before sealing with a top coat for a lasting finish.
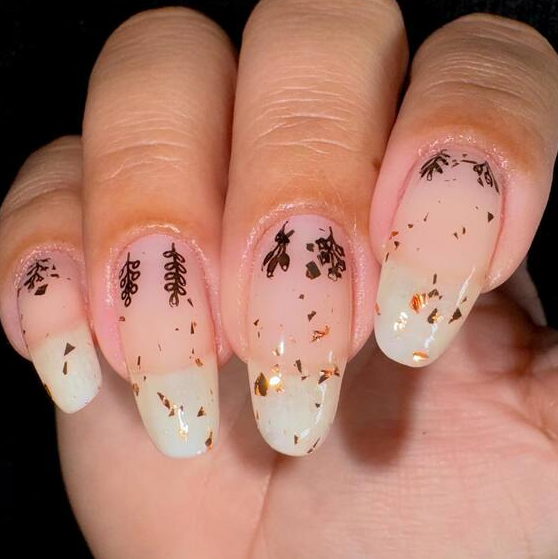
Golden Autumn Dream
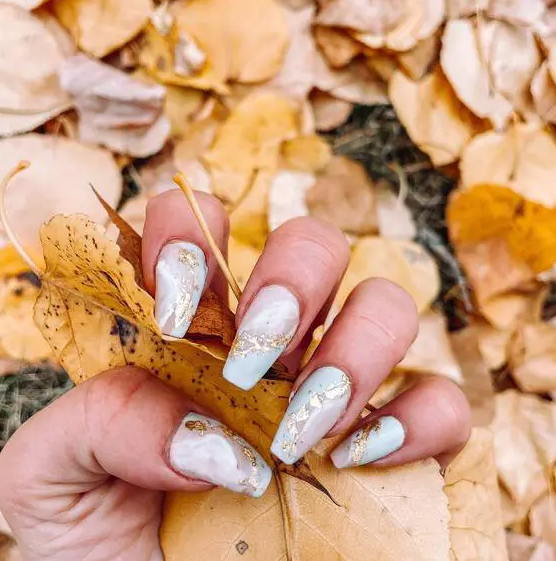
This design captures the serene beauty of autumn with its use of cool blue and white shades, enhanced by gold flake accents that add a touch of luxury and mimic the appearance of early frost on fallen leaves. The soft gradient creates a dreamy backdrop for the intricate gold leaf detailing, making it a sophisticated choice for autumn.
Materials Needed
- Base Coat: Essie ‘Grow Stronger’
- Blue and White Gradient Polishes: Essie ‘Bikini So Teeny’ and ‘Private Weekend’
- Gold Flakes
- Top Coat: INM Out the Door
DIY Instructions
Begin with a base coat to protect the nails. Create a gradient effect by applying ‘Private Weekend’ at the base of the nail and blending into ‘Bikini So Teeny’ towards the tip. While the gradient is still tacky, carefully place gold flakes using tweezers for precision. Seal the design with a top coat for a smooth, glossy finish.
Gothic Fall Glamour
This design brings a touch of gothic elegance to the fall palette, incorporating detailed imagery of skulls amidst autumn leaves, all set against a glossy black background. The intricate artwork and rich detailing make this style a perfect choice for those looking to combine traditional seasonal motifs with an edgy twist.
Materials Needed
- Base Coat: CND Stickey Base Coat
- Black Nail Polish: OPI ‘Black Onyx’
- White and Orange Nail Art Pens
- Top Coat: Seche Vite Dry Fast Top Coat
DIY Instructions
Apply a base coat to protect the nails. Paint a solid black base with ‘Black Onyx’. Once dry, use white and orange nail art pens to draw skulls and autumn leaves. This requires a steady hand and a bit of artistic flair. Seal the design with a fast-drying top coat to protect your artwork and add a brilliant shine.
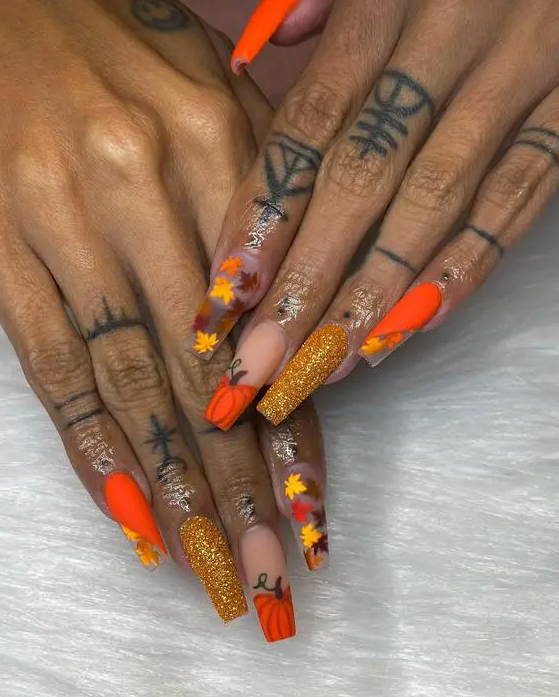
Harvest Glow
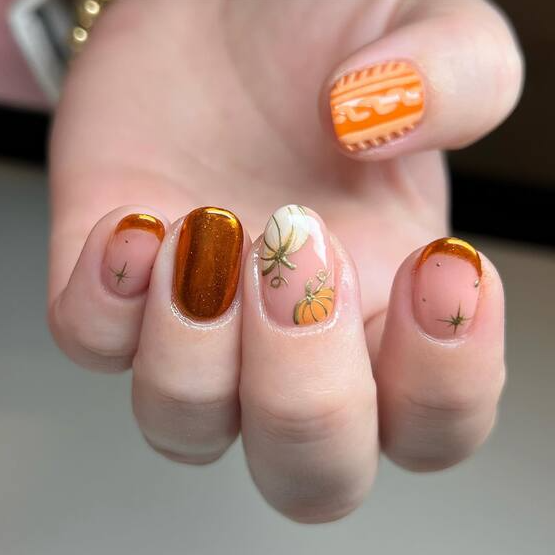
The ‘Harvest Glow’ design captures the warm tones of a fall harvest with its orange hues and pumpkin accents. The combination of a glossy finish and delicate white artistry depicting pumpkins and fall foliage evokes a feeling of walking through a pumpkin patch on a crisp autumn day.
Materials Needed
- Base Coat: CND Stickey Base Coat
- Orange Glossy Polish: Essie ‘Autumn Blaze’
- White Nail Art Pen
- Top Coat: Seche Vite Dry Fast Top Coat
DIY Instructions
Start with a base coat to ensure your nails are protected. Apply the orange glossy polish as the base color. Use a white nail art pen to delicately draw pumpkins and vines on one or two accent nails. This will create a focal point and enhance the thematic feel of the manicure. Finish with a top coat for a lasting shine and protection.
Jeweled Autumn Spectrum
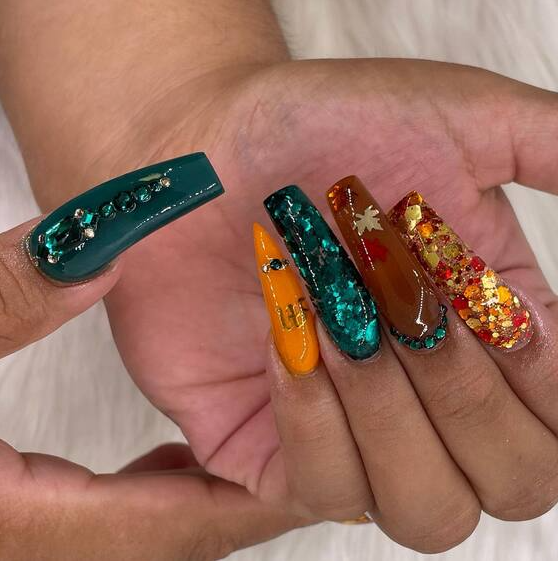
This design is a breathtaking array of jewel tones that encapsulate the depth and luxury of the autumn season. Each nail is a masterpiece, featuring deep greens and vibrant oranges, enriched with intricate embellishments and textures. The use of sequins and metallic chains adds a dramatic flair, making these nails a perfect accessory for any fall event.
Materials Needed
- Base Coat: Essie ‘Here to Stay’
- Green Nail Polish: China Glaze ‘Jade-d’
- Orange Nail Polish: OPI ‘Yank My Doodle’
- Gold Sequins and Metallic Chains
- Gel Top Coat: Gelish ‘Top It Off’
- Tweezers and Glue for application of embellishments
DIY Instructions
Apply a base coat to protect your nails and enhance the polish adherence. Paint the nails alternately with green and orange polishes. While the polish is still tacky, use tweezers to place sequins and metallic chains strategically to create a textured look. Finish with a gel top coat to secure the embellishments and add a glossy finish.
Metallic Pink With Industrial Accents
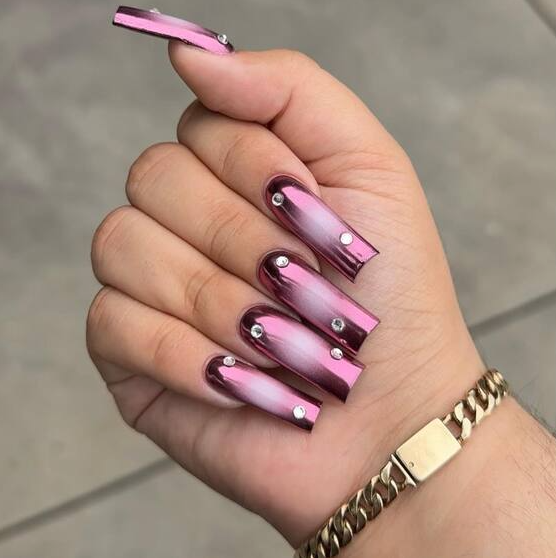
This innovative design marries soft metallic pink with industrial-inspired elements, featuring bold metal rivets that provide a unique contrast. The reflective nature of the metallic pink gives a nod to the modern, while the rivets signify strength and durability, echoing the transformative season of fall.
Materials Needed
- Base Coat: OPI ‘Natural Nail Base Coat’
- Metallic Pink Nail Polish: Sally Hansen ‘Pink Cadillaquer’
- Metal Rivets: Available at craft or hardware stores
- Strong Adhesive: For affixing rivets
- Top Coat: INM ‘Out The Door’
DIY Instructions
Begin by applying a base coat. Once dry, apply two coats of the metallic pink nail polish. Before the second coat dries, carefully place the metal rivets on the nails using a drop of strong adhesive for each. This will ensure they adhere firmly. Finish with a fast-drying top coat to seal in the design and the rivets.
Modern Autumn Mix
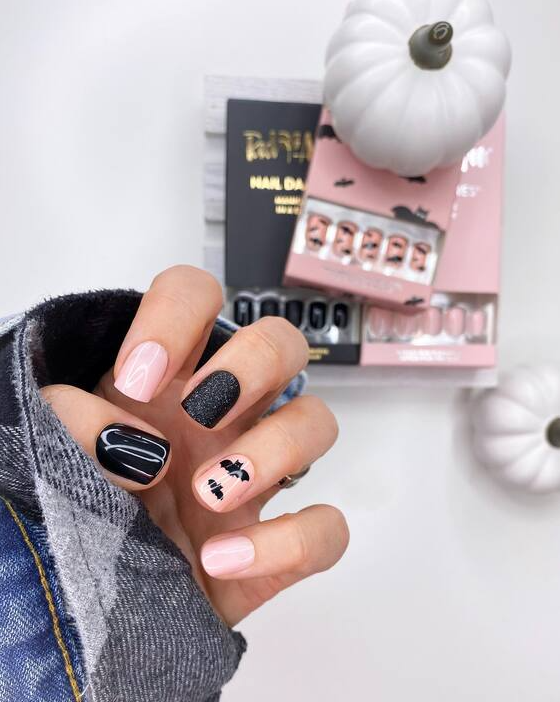
This nail design is a playful yet sophisticated blend of autumn vibes with a modern twist. The combination of soft pink and black with matte and glossy finishes creates a striking contrast. Highlights include a whimsical depiction of bats and stripes that add a seasonal touch, perfect for Halloween festivities or just a nod to the darker days of fall.
Materials Needed
- Base Coat: OPI Natural Base Coat
- Pink Nail Polish: Essie ‘Muchi, Muchi’
- Black Nail Polish: Sally Hansen ‘Black Out’
- Matte Top Coat: Essie Matte About You
- Glossy Top Coat: CND Vinylux Weekly Top Coat
- Detailing Brush
DIY Instructions
Begin with a base coat to protect your nails. Apply two coats of pink on all fingers except for the accent nails, which will be in black. Use the detailing brush to draw bats and stripes on the accent nails. Apply a matte top coat over the black and a glossy top coat over the pink for a multidimensional finish.
Spiced Latte Art
Emulating the warm tones of a spiced latte, this design features a delicious blend of orange and cream colors with playful polka dots and floral patterns. This design is an ode to cozy autumn days, combining both charm and warmth in its presentation.
Materials Needed
- Base Coat: CND Stickey Base Coat
- Cream Nail Polish: Zoya ‘Ivory’
- Orange Nail Polish: Essie ‘Playing Koi’
- Dotting Tool
- Fine Detail Brush
- Top Coat: Seche Vite Dry Fast
DIY Instructions
Start with the base coat for longevity. Apply the cream polish as the base layer. Once dry, use the orange polish with a dotting tool and a fine brush to create polka dots and small floral patterns. Aim for randomness to mimic the organic feel of latte art. Finish with a quick-dry top coat to seal in the design and add shine.
Spooky Season Delights
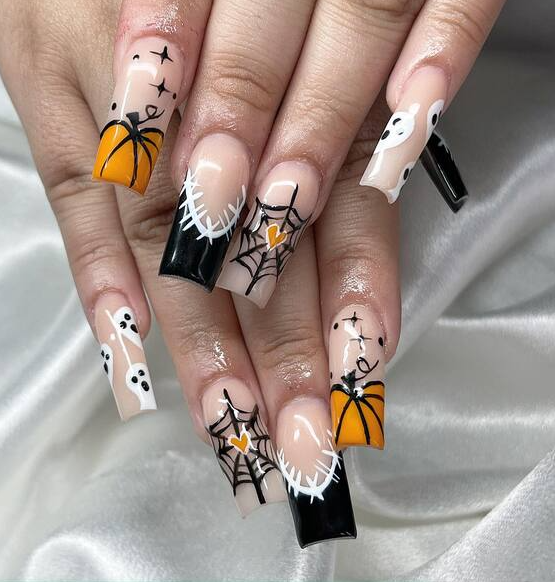
Embrace the spirit of Halloween with this creatively themed nail art featuring classic spooky elements like ghosts, spider webs, and pumpkins. This design is perfect for Halloween parties or to add a fun, thematic twist to your everyday October look.
Materials Needed
- Base Coat: Essie ‘Here to Stay’
- Black Nail Polish: OPI ‘Black Onyx’
- White Nail Art Pen
- Orange Nail Polish: China Glaze ‘Orange Knockout’
- Top Coat: INM Out The Door Super Fast Drying Top Coat
DIY Instructions
Apply a base coat to start. Use ‘Black Onyx’ as the base for your accent nails, and ‘Orange Knockout’ for others. Employ a white nail art pen to draw spider webs and ghosts on the black base. On the orange nails, paint small pumpkins or add star decals for an extra festive touch. Finish with a protective top coat to ensure your spooky designs last through all your Halloween festivities.
Sunset And Sunflower Elegance
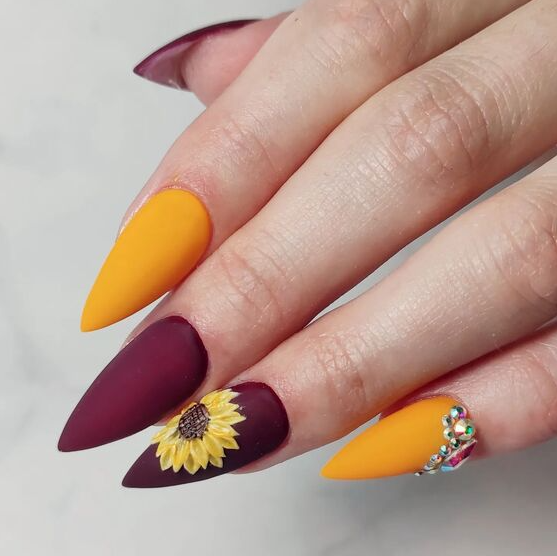
This striking nail design captures the essence of a fall sunset with its rich color palette of deep maroon and vibrant orange. The addition of a sunflower decal and intricate beadwork on alternating nails adds a unique touch, blending rustic charm with sophisticated elegance. This design is perfect for those who appreciate a bold statement while embracing the natural elements of the season.
Materials Needed
- Base Coat: OPI Natural Nail Base Coat
- Maroon Nail Polish: Essie ‘Bahama Mama’
- Orange Nail Polish: China Glaze ‘Sun Worshiper’
- Sunflower Decals
- Rhinestones and Beads for embellishment
- Top Coat: Seche Vite Dry Fast Top Coat
DIY Instructions
Begin with a base coat to protect your nails and improve the longevity of your polish. Apply two coats of ‘Bahama Mama’ on the maroon nails and ‘Sun Worshiper’ on the orange nails. Once dry, carefully place a sunflower decal on one of the maroon nails. On an orange nail, create a focal point by arranging rhinestones and beads in a desired pattern. Seal all designs with a high-gloss top coat to ensure durability and to enhance the vibrancy of the colors.
Tribal Autumn Patterns
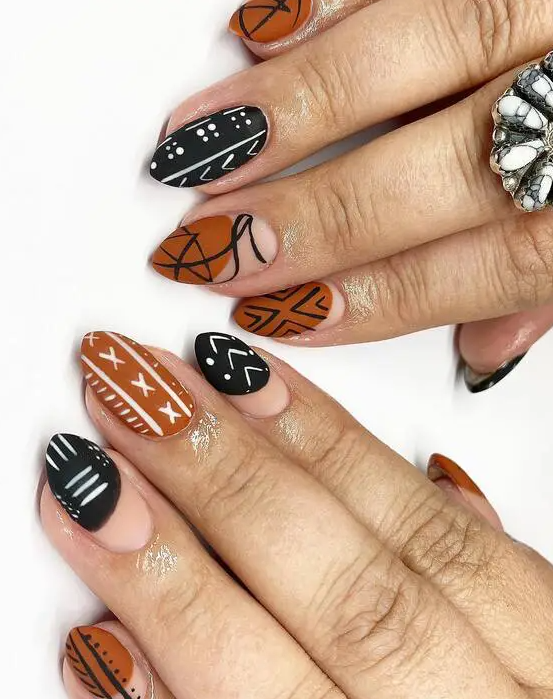
This design takes a bold approach with tribal-inspired patterns in classic autumn shades of black, orange, and white. The intricate detailing and varied patterns on each nail celebrate the diverse textures and colors seen during the season, offering a contemporary yet festive look perfect for any autumn occasion.
Materials Needed
- Base Coat: Essie ‘Here to Stay’
- Black Nail Polish: China Glaze ‘Liquid Leather’
- Orange Nail Polish: Essie ‘Meet Me at Sunset’
- White Nail Art Pen
- Top Coat: Seche Vite Dry Fast Top Coat
DIY Instructions
Begin with a protective base coat. Alternate the base colors between black and orange across the nails. Use a white nail art pen to create tribal designs, experimenting with different patterns such as zigzags, stripes, and chevrons to add visual interest. Finish with a top coat to enhance the colors and protect the artwork.
Vibrant Autumn Leaves
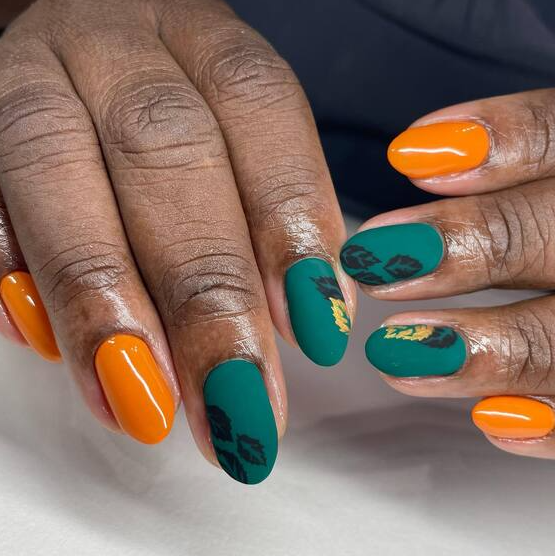
Embodying the vibrant colors of fall foliage, this design uses a combination of rich green and bright orange polishes, accented with golden leaf patterns to reflect the changing leaves of the season. This bold and colorful approach is perfect for those who want to make a statement with their nail art during the fall months.
Materials Needed
- Base Coat: Sally Hansen Double Duty
- Green Nail Polish: China Glaze ‘Jade-d’
- Orange Nail Polish: OPI ‘It’s a Piazza Cake’
- Gold Leaf Stickers
- Top Coat: CND Vinylux Weekly Top Coat
DIY Instructions
Apply a base coat to each nail for longevity. Paint alternating nails with green and orange polishes. Once dry, apply gold leaf stickers to create a dynamic autumn leaf pattern. Finish with a durable top coat to ensure the stickers remain secure and the polish maintains its luster.